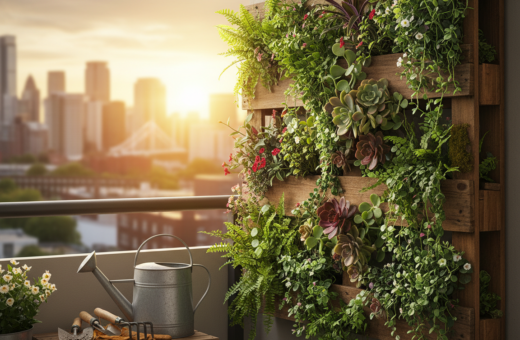
Small outdoor areas can become productive and attractive without big expense. This introduction outlines one practical approach to building low-cost supports that hold plants along railings on a small apartment balcony or patio.
Kristi Armes published a clear guide on January 14, 2026, showing how efficient setups save space and boost yields. The Garden Tower Project also runs seasonal discounts, which can cut costs for materials and planters.
The focus is on affordability and durability. Readers will learn how to choose sturdy materials and arrange containers so plants get sun while keeping a tidy look. This short guide aims to help homeowners create a functional balcony garden that fits tight footprints and delivers real results.
Benefits of Vertical Gardening
Using height to plant increases yield without expanding footprint. For renters and apartment dwellers, a vertical garden makes it possible to grow more food in a compact area. This approach suits small outdoor areas where floor space is limited.
Elevating planters improves air circulation and sun exposure. Better airflow and light help reduce fungal problems and boost healthy growth for herbs and vegetables. Many gardeners find that stacking or tiering plants creates a lush, productive display.
Keeping plants off the ground also cuts pest pressure. Raising containers deters slugs and ground beetles that often attack horizontal beds. That leads to stronger, more vibrant plants and less time spent on pest control.
- Efficient use of space: more crops per square foot.
- Renters-friendly: most systems do not need permanent fixes.
- Fresh herbs year-round: a vertical herb garden brings culinary plants within easy reach.
Exploring vertical garden ideas helps people tailor systems to their needs. With modest effort, even the smallest outdoor setting can become a reliable source of fresh produce.
Assessing Your Balcony Microclimate
Start by mapping how light moves across your outdoor space through a full day. Most edible crops need about six hours of direct sun to produce well, so note when sunlight reaches each corner of the area.
Sunlight Exposure
South-facing sites warm fastest and offer the most intense light. North-facing spots stay cooler and suit shade-tolerant plants. Observe shadows cast by nearby walls and buildings to avoid surprises.
Wind and Weather Factors
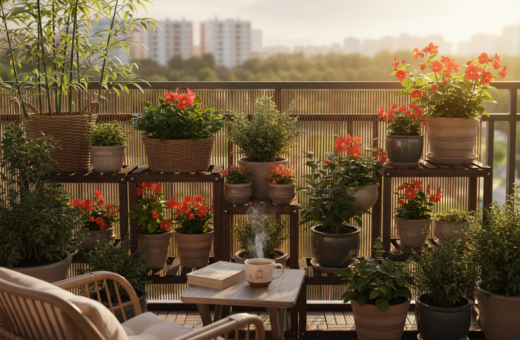
High-rise patios can be windy, which stresses fragile plants and dries soil quickly. Installing a privacy screen or bamboo panel will reduce gusts and create a calmer microclimate.
- Check sun for six hours: measure or watch sunlight across the day.
- Watch for shadows: walls and structures can cut usable light.
- Protect from wind: a screen helps; choose sturdier crops like kale or chard if winds persist.
- Position smartly: place containers where they get the most consistent light.
Understanding these factors makes it easier to pick the right plants and arrange the space so gardens thrive even in tight apartment settings.
Planning Your DIY Vertical Garden Balcony
Before building anything, map the usable floor and overhead clearance to avoid cramped layouts and blocked doors.
Measure the room and mark door swings. This simple step stops surprises and keeps seating and walkways clear. It also shows where a Garden Tower 2 or a freestanding rack will fit without complex installation.
- Measure floor area to confirm enough room for a planned project.
- Plan positions so door swings and patio furniture stay usable.
- Research vertical garden ideas to match style and plant needs.
- Include a vertical herb garden to save floor space and add fresh herbs near the kitchen.
Use a checklist and simple sketch to visualize the layout. A systematic plan saves time and creates a functional, attractive way to use vertical space for long-term gardening success.
Essential Tools and Materials
The right mix of reclaimed boards and new lumber makes this project both eco-friendly and sturdy. Use crib slats or other reclaimed wood together with common pine boards and furring strips for the main frame. This blend keeps costs low while adding character to the planter.
Sourcing Reclaimed Wood
Look for old crib slats, pallet boards, or cleared fence boards at salvage yards and local listings. Reclaimed pieces are affordable and reduce waste.
Prep matters: sand rough edges with 150-grit sandpaper before priming or painting to protect against weather and splinters.
- Key tools: a reliable drill, a nail gun, a saw, and assorted screws make assembly fast and secure.
- Secure pots: choose planters and clips that fit together so pots stay put in wind.
- Durability: pine boards fare well outdoors when properly sealed, giving the structure a longer life for gardening use.
Having the right tools and well-prepared materials simplifies the build and helps the finished garden structure perform well for years to come.
Selecting the Right Vertical Structure
Choosing support that matches crop habits and wind conditions helps plants stay secure through the season.
The easiest way to avoid drilling into railings is a freestanding tower. Models like the Garden Tower 2 work well because they sit on the floor and can be moved if light or weather changes. This option keeps walls intact and lets renters adjust layout without tools.
Trellises are essential for vining crops such as tomatoes and cucumbers. A sturdy garden trellis provides a vertical wall for climbing plants and adds visual interest to the space.
- Support matters: pick structures that hold pots and herbs securely for daily care.
- Save floor room: wall planters create greenery without taking up walking space.
- Mobility: many gardeners choose freestanding pieces so they can move plants for light or storm protection.
- Durability: choose materials rated for wind and rain to keep plants safe in summer storms.
Preparing Your Space for Installation
Start by verifying load limits and local rules before placing any heavy planters or racks. Check the building’s weight capacity and any restrictions on attachments to walls or railings. Confirm rules about structure height and drilling into common walls.
Clear the area and clean the floor where the new structure will sit. A tidy surface creates a stable base and reduces tripping hazards.
Measure carefully. Accurate dimensions prevent surprises during assembly and help place the unit where it gets proper sun and airflow.
- Inspect walls to ensure they can support mounted hardware and the weight of soil and planters.
- Confirm building rules with management to avoid fines or required removal later.
- Account for drainage so water does not pool at the base or run into shared areas.
- Use proper hardware rated for outdoor loads when attaching anything to walls or railings.
A well-prepared space saves time and keeps the installation safe and long lasting.
Building a Sturdy Base Box
A solid base box prevents sag and keeps planters level when the soil is heavy and wet. Use 1-inch x 8-inch x 8-foot pine cut into 30-inch pieces for the front, back, and bottom to form a strong base. Pre-drill all screw holes to avoid splitting the boards.
Ensuring Proper Drainage
Drill multiple drainage holes in the bottom panel so water does not pool under pots. Good drainage protects wood and prevents root rot in containers. Raising the box slightly with scrap wood at each corner improves flow and keeps the base dry.
Reinforcing Pressure Points
Reinforce corners and load zones with long screws and scrap blocks. Place reinforcing screws at all stress points where the load concentrates. This helps the base hold heavy, wet soil and full pots through seasons on a small patio.
- Use quality pine: it gives a reliable base that lasts.
- Pre-drill: prevents splitting when inserting screws.
- Corner lifts: add scrap wood to raise and improve drainage.
Attaching Vertical Support Pieces
Set each upright into position and check that it is perfectly vertical before any fasteners are added. Use a level and measure spacing to match where cross members and wall planters will attach. This step prevents crooked rows and keeps the final look professional.
Hold supports in place with a nail gun for quick, temporary fixing. Then pre-drill holes and drive high-quality exterior screws for a permanent, tight fit. This two-step method gives speed without sacrificing strength.
These support pieces form the primary vertical wall that will accept horizontal cross members and planters. Secure alignment now so the load from soil and plants won’t twist or pull the frame later.
- Use a nail gun first to speed placement and keep pieces steady.
- Pre-drill and screw for a lasting connection that resists wobble under weight.
- Confirm plumb and spacing so creating vertical rows for planters is simple and neat.
Once attached, step back and visualize the finished vertical garden wall. Properly fastened supports are the backbone of a sturdy, attractive planting display.
Installing Horizontal Cross Members
Start by laying out where each 31.5-inch pine board will sit so the assembly stays level and predictable.
Mark positions on the uprights and use a level for consistency. These cross members were cut to 31.5 inches and attached to the vertical supports with a nail gun and screws for a fast, secure fit.
These horizontal pieces form the frame that accepts pot clips and adds secondary support to the wall. Proper placement optimizes space for different planters and climbing plants.
“Well-installed cross members make the whole structure safer and more modular.”
- Ensure even spacing so the vertical wall can bear weight without sagging.
- Use a nail gun to hold boards, then pre-drill and drive exterior screws for permanence.
- Plan clip locations for easy removal and rearrangement of planters.
- A sturdy garden trellis system improves airflow and sunlight exposure for all plants.
Final check: confirm each board is tight and countersunk. These cross members keep walls stable and let the system function as a flexible, modular trellis for year-round planting.
Painting and Protecting Your Structure
A quality primer and paint system turned the raw frame into a durable, low-maintenance planter wall.
The builder applied one coat of Zinsser Bulls Eye 1-2-3 Primer, followed by two coats of HGTV Home by Sherwin-Williams. This combination seals the wood and blocks moisture that would otherwise soak into the base and joints.
Full coverage matters: every face, edge, and inside corner received paint to stop water from penetrating and causing rot. The base that holds wet soil received extra attention.
- Use an outdoor-rated primer and two finish coats for best protection.
- Choose a neutral tone like beige to help the wall blend with existing decor.
- Paint pots to match or contrast for a polished, cohesive look.
“Following manufacturers’ directions ensures the surface cures properly and lasts through seasons.”
Regular touch-ups keep the structure looking fresh and extend life. Treat this step as part of ongoing maintenance for the project and its planted containers.
Choosing the Best Plants for Your Space
Smart plant choices match sunlight, wind and container size for steady harvests. A well-planned selection helps the wall stay productive and easy to maintain.
Full Sun Varieties
Tomatoes and peppers perform best in the top tiers where sun is most intense. Place large planters there so roots have room and fruit can ripen fully.
Partial Shade Options
Leafy greens such as lettuce and some herbs prefer cooler pockets lower on the wall. These plants tolerate less direct sun and benefit from afternoon shade.
Low Light Performers
For dimmer corners, choose hardy herbs like thyme and cilantro or shade-tolerant greens.
- Match plants to sun exposure: observe light across the day before planting.
- Use containers sized to each plant’s root needs to avoid stress.
- Mix herbs and flowers to attract pollinators and create balance on the wall.
“Selecting appropriate plants ensures a healthy, long-lasting planting wall.”
Soil and Nutrient Requirements
Containers need a soil recipe that balances drainage, nutrients, and moisture retention.
Use a lightweight potting mix to keep containers from becoming too heavy and to prevent compaction. Light mixes improve root oxygen and reduce stress in small planting systems.
Amendments matter: blend 10–20% compost or worm castings into the potting mix to raise nutrient levels and improve moisture-holding capacity.
- Provide the right soil — containers dry faster than beds, so choose mixes with good porosity.
- Mix in compost or castings (10–20%) to boost fertility and microbial life.
- Watering basics: lighter mixes need consistent moisture checks; do not assume daily routines fit every exposure.
- Avoid packing soil: loose fills allow roots to spread and plants to develop properly.
“Consistent soil management is the key to healthy, productive planting in limited spaces.”
They should check moisture often and adjust watering to match sun and wind. Good soil and steady care make vertical gardening successful and low-stress over the season.
Arranging Plants for Optimal Growth
Taller crops should sit above smaller ones to prevent shading and allow even ripening. Place sun-loving vegetables at the top of the wall so they get the peak light. Leafy greens belong lower to avoid scorching and to enjoy cooler microclimates.
Group plants with similar water and light needs together. This makes watering and feeding efficient and reduces stress on sensitive herbs and plants. Consider mature size when placing each planter so plants don’t crowd one another as they grow.
- Use hanging pots for trailing fruits like strawberries to add visual interest and free floor room.
- Include flowers such as marigolds or nasturtiums near vegetables to help repel pests and attract pollinators.
- Rotate pots periodically so each side of a plant gets equal sun and grows evenly.
A well-arranged planting wall looks attractive and functions smoothly, giving the room a steady supply of fresh produce while making maintenance straightforward.
“Strategic placement ensures each plant receives optimal sun and airflow for healthy growth.”
Watering and Maintenance Strategies
A steady watering routine is the single most effective way to keep plants healthy through heat spells.
Check soil moisture daily during hot weather and water 2–4 times per week. Pots at the top dry out faster, so inspect them first.
Water in the morning to reduce evaporation and give plants time to recover before the peak sun. Avoid wetting leaves in the evening to lower fungal risk.
- Develop a consistent plan: a set schedule helps maintain even moisture across the wall.
- Prune regularly: trimming herbs and removing dead foliage encourages new growth.
- Watch for stress: drooping leaves often signal thirst or heat stress and require immediate attention.
Use a base tray or small reservoir under the lowest row to catch runoff. This protects neighbors below and recycles a bit of water back to the soil.
“Consistent care and attention will keep a vertical garden lush and productive all season.”
In short: daily checks, morning watering, and routine pruning form the best way to sustain a compact garden through summer heat.
Troubleshooting Common Balcony Issues
Common issues on small patios often show up as soggy trays, wind-tossed pots, or rapidly drying soil.
If water runoff is a problem, use containers with catch trays or install a slow-drip irrigation system to control flow and reuse excess.
Rapid soil drying can be solved by adding a thin layer of mulch or a water-retentive amendment to each pot. This keeps moisture steady and cuts watering frequency.
- Yellow leaves? Check drainage holes — overwatering is often the cause.
- High winds? Fit a protective screen or choose low-profile structures to reduce stress.
- Worried about drips to neighbors? Use built-in reservoirs to capture excess water.
- Inspect walls and support pieces regularly for wear and loose fasteners.
Pest issues respond well to cleanliness and companion planting. Remove debris, rotate pots, and use natural deterrents to protect vegetables and herbs.
“Addressing small problems early keeps the wall stable and plants productive.”
Staying proactive — routine checks and fast fixes — preserves space, protects neighbors, and keeps long-term structures safe.
Conclusion
Simple supports let apartment gardeners harvest herbs and vegetables from tight space. A well-built vertical garden can be both productive and attractive.
By assessing sunlight, choosing appropriate plants, and keeping a steady watering routine, they will enjoy steady yields. These steps make planting manageable for busy residents.
Following the plan in this guide helps create a functional, long-lasting garden that fits a small outdoor space. It also reduces pest and water issues when set up correctly.
Use these practical garden ideas to transform a plain railing area into a living wall. With proper care, a balcony garden will supply fresh herbs and vegetables all season.